How to create the perfect gallery wall

If you’ve been wanting to create a gallery wall in your house, haven’t attempted it because of the fear of putting too many extra holes in your walls, you’ll love this article. I’ve hung this gallery using our new Place&Push® picture frames and you won’t believe how easy it was. I’ve put together this “how-to” to make it as easy as possible for you to recreate this gallery look in your own house.

I hung these 9 picture frames in the reception area of our office and have received so much positive feedback from friends and guests that I thought I’d share how I hung each frame. Don’t be intimidated by the length of this article, I’ve put everything in writing because often readers ask me for measurements on projects I do so you decide what you want to read or if you just want to look at the pictures.

This is what I started with:
- It’s a big wall – 15′ wide
- The total width of the sofa including the arms – 9′
- We have tall ceilings – height is 8’6″
- My display had to be quite large to balance out the size of the sofa and to fill a good chunk of wall space
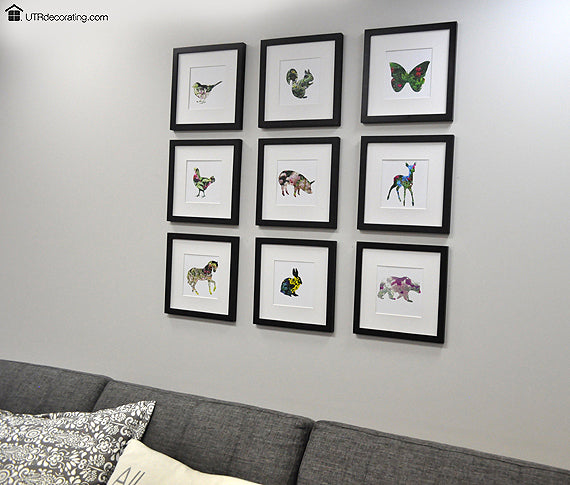
- I decided to hang 9 frames in total, 3 rows of 3 frames each

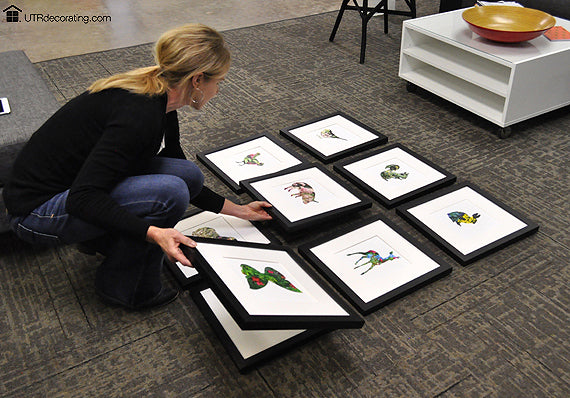
First, I placed all the frames on the floor to decide the order to place them in. Some prints had more pink than others, so I made sure to balance out the pink and other colours and the size of each animal throughout the display. I always hang my favourite piece in the middle, in this case it’s the piglet.
You can’t tell from the pictures but the couch is not centered on the wall. Centering simply didn’t work but it wasn’t necessary because the goal was to centre the gallery over the couch not on the wall.
I started by hanging the bottom row and worked my way up. Note that I have the frames that I’ll hang in the bottom row on the floor leaning against the wall ready to be hung.
I found the centre of the couch and hung my first frame straight up from that centre. You can see in the pictures at the very bottom approximately how much space I left. I tried with the row hanging higher but the top row of frames was going to touch the ceiling so I brought the display down a notch.

The key to hanging a great gallery:
- Hang the first frame, step back and assess the height in comparison to the furniture sitting below.
- Questions to think about:
- Does the frame feel too close to the top of the couch?
- Or is the frame too far away from the couch and it feels like there’s too much wall space between the couch and the bottom of the frame?
- How much spacing to leave between frames.
- Is your first frame hanging straight? If it’s not, fix it right away because it’s the foundation of the entire gallery.
Here’s what I did:
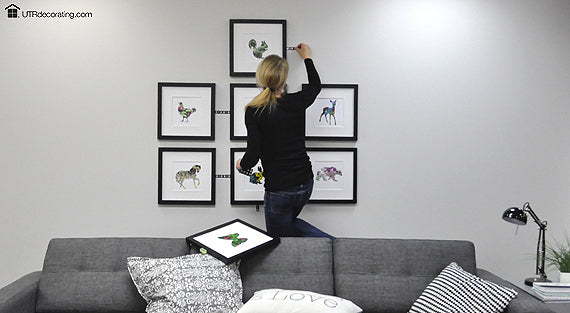
- I hung my first frame (5″ from the top of the sofa cushions)
- I used the Spacing Strips (arrows) that come with the frames to evenly space my frames.
- Each arrow measures 2″. Since I wanted to fill lots of wall space, I left 4″ in between horizontal space. I used 2 arrows back to back to equal 4″.
- For the height between each row, I used 1 arrow = 2″ = 1 arrow.
- If you don’t have the arrows, use equal sized pieces of painter’s tape.

The order I hung my frames in:
- I started by hanging the middle frame from the bottom row.
- Next, the frame on the right, bottom row. You can hang the one on the left, it doesn’t matter.
- Then I moved to the second row and hung the middle one followed by the right and left.
- Top row, the same hanging order.
- P.S. I don’t have the glass in the frames because it caused too much glare when taking photos for this article.


Here I’m showing how much space we left between the sofa and the bottom of the frames, 5″.
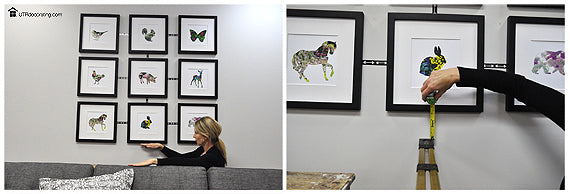
Here’s a complete map of the spacing left between all the frames to create a perfect gallery. Enjoy!

What would I do differently next time?
- In the end, the total width of the display is 54″, since the couch and wall are so big I could have hung one more vertical row on the right and one of the left. So I’d have 15 frames in total.
- Although the current gallery looks terrific, having 15 frames would equal to 3/4 of the wall above the sofa and be even more beautiful – giving a larger presence meaning delivering even more WOW factor. I might just do it.
About the black frames:
- At first glance, they appear no different than any other frames. The big difference is that you simply push the frames into the wall to hang them.
- These Place&Push® frames completely eliminate the need to mark and install hardware – the hangers are already fitted on the frames.
If you decide to recreate this gallery, send some pictures! We’d love to see the results.


SHARE:
